I was so excited to share the pictures I took at the Apron Chronicles Exhibit at the Cowgirl Museum in Ft. Worth. A couple of days ago I spent almost 30 minutes editing my pictures before I transferred the pictures to my folder so I could write this post and share my pictures. Before I transferred my pictures, the program got stuck! I cannot open it back up, it says that it is "open" somewhere, but neither my husband nor I can find it. I have lost all of my pictures that I had not transferred yet. I am very sad.
Let me tell you about the exhibit. EllenAnne Giesel put together the exhibit with a lot of aprons. They are hanging from the ceiling and on the walls. She has "apron memories" on the wall with pictures of people wearing aprons. There is even a "closet" full of aprons you can dig through and try on. I really enjoyed the exhibit, if I am able to ever retrieve my pictures, I will post them for you.
You can also get her book The Apron Book EllenAnne Geisel. It is a great book with lots of pictures, "apron memories" and tutorials.
Have a great day!
Missy

Homemaking, Baking, Cake decorating, Sewing, Quilting and Serving God!
Thursday, March 31, 2011
Saturday, March 26, 2011
Sugar
I was thinking about it today and realized that I may have forgotten to point out the use of sugars in my blogs. Most of my baking is done for my friends who do not like cane sugar therefore I will use palm sugar/thot not sugar in my recipes. This is not necessary though if you want to use plain cane sugar, raw sugar, organic sugar etc. Keep the sugars amounts the same in the recipe. All these sugars can be used interchangeably with the same results. The only difference is that palm sugar is thick therefore will produce a denser cake, but it still tastes great! Never cut the palm sugar in the recipe - desserts are supposed to be sweet! If you are cooking something savory then go ahead and cut the palm sugar down.
Why do I use palm sugar you ask? Palm sugar is a healthy alternative for diabetics and other conditions that cannot have cane sugar. Here are some facts and their links that I have found on the internet:
It has a glycemic index of 35. By comparison, the GI of honey is 55 - 60, and high fructose corn syrup (HFCS) is 62. Maltodextrin, a common powder often added to many sweeteners, has a GI of 105! (http://www.snac.ucla.edu/pages/Reso...)
Learn more: http://www.naturalnews.com/028996_palm_sugar_natural_sweetener.html#ixzz1HlWNvCIz
http://www.naturalnews.com/028996_palm_sugar_natural_sweetener.html
The most important benefit of palm sugar is that it has low “glycemic index”. What that means is that when you consume palm sugar, you will not experience a spike in your blood sugar levels. There is a gradual releasing of the sugars in the digestive tract due to the low glycemic index of palm sugar. This is one major reason why palm sugar can be a great substitute for real sugar (processed cane sugar).
Another benefit of palm sugar is that it’s a wholesome food, and so has a high nutrition content. A look at the palm sugar nutritional facts/data would show that it contains Vitamin A, B1, B2, B6 and Vitamin C. It’s also abundant in minerals like calcium, iron and phosphorous. The table sugar does not contain any nutrition and causes a spike in blood sugar because of its low glycemic index.
Palm sugar is a great option for diabetics. If you are suffering from diabetes, palm sugar would be healthier than stevia, and it’s low GI index will ensure that your blood sugar levels don’t spike.
http://www.outofstress
The information in blue I have copied directly from other websites and I have included the website I received the information from.
No, I do not eat strictly palm sugar, but I mostly eat palm sugar. So just remember that my recipes can be interchanged with any kind of sugar, but if you use honey or agave nectar the texture will not be the same and may not hold together.
If you have any questions - just ask! Just leave me your email add. so that I can reply back to you!
Happy Baking!
Missy
Wednesday, March 23, 2011
Delicious Banana Layer Cake
 I picked up The Sothern Heritage Cakes Cookbook at a library sale. I love reading this book and the recipes. It has several recipes of the same type of cake sometimes, which I enjoy because sometimes I won't have the ingredients for one recipe, but will for another recipe. My friend requested a banana cake for the baby shower cake for last week and I found a great banana nut cake recipe in here.
Delicious Banana Layer
1/2 cup butter, softened
1 1/2 cups sugar (I used palm sugar)
2 eggs, seperated
1 tsp baking soda
1/4 cup plus 1 tbl buttermilk
2 cups all-purpose flour (I used 1 cup kamut flour and 1 cup all-purpose flour)
3 large ripe bananas, mashed
1 cup chopped pecans (don't cut them too small like I did)
Cream butter; gradually add sugar, beating well. (If using palm sugar, be sure to beat until the sugar is well mixed.) Add egg yolks, one at a time, beating well after each addition.
Dissolve soda in buttermilk; (I used vinegar to sour my milk, so I just added the soda to my flour) add to creamed mixture alternately with flour. Stir in mashed bananas and pecans.
Beat egg whites (at room temperature)until stiff peaks form; fold into batter.
Pour into 2 greased and floured 8-inch round cakes pans (I did a 9x13). Bake at 350 for 30 minutes or until a wooden toothpick inserted in center comes out clean. Cool cake in pans 10 minutes; remove layers from pans, and let cool completely. It will stick in a glass pan, I know this from experience!
Monday, March 21, 2011
Buttercream Transfer

I reviewed a DVD by Sharon Zambito called Sheet Cake Secrets. You can buy it here: http://www.decoratethecake.com/store/WsDefault.asp?One=977


This is what the DVD looks like with a couple of her cakes. The first cake is a color run, I can't wait to try. She makes it look so easy! I love the way she uses buttercream mostly with a few fondant accents since so many of my friends don't like fondant. She teaches how to get your buttercream perfectly smooth (My baby shower cake had to be cane sugar free, so my thot not powder sugar did not turn out white, and could not get very smooth), She teaches how to make great gumpaste daisies, and gives the extra tips that only another decorator can give you. I loved the ruffled border and the fondant border also. Th puppy cake is a frozen buttercream transfer. I had never heard of this technique before, and her instructions are very clear and easy to follow. Her airbrushing techniques are awesome and very informative. The royal icing bumble bees are so cute and easy to make. She also makes a cowboy out of chocolate transfer, I will b e trying this technique on an upcoming cake. I'm not able to afford these $200 cake classes so I love having a cake video to learn from, and I will be watching it over and over again because she tells you how to make every part of the cake, from the backgrounds to the trim and even the borders. She's a great teacher and I really enjoyed the video!
I decided to make the buttercream transfer for a baby shower cake I made for a friend last week. Except for having to use a special sugar, it was the least stressful cake I have made in a while! First, I took granulated palm sugar or thot not sugar and made it into powdered sugar, (get the how-to here: http://missyscakesandaprons.blogspot.com/2011/02/powdered-sugar-made-from-palm-sugar.html ) then made regular buttercream. I printed off a clip art of a baby I found online and taped it to the back of a cutting board, I then taped a transparency sheet to the top over the picture. Then I outlined the baby in black buttercream.


Next I colored in the blue top and diaper. Then I colored in my flesh color, the tip I used was too big and distorted my feet some.


Be sure to reinforce your buttercream transfer over the op by using extra buttercream, but first check and make you don't have any "holes" by looking from the bottom, I forgot to do this and it really makes a difference. I did not make my transfer thick enough, and I think the thot not was not as strong as powdered sugar, and my transfer broke under the chin when I was ready to put it on the cake.
Next put it in the freezer for a few hours or overnight.


Carefully remove the transfer from the cutting board (Sharon recommends Plexiglas, I have not bought mine yet though), turn the transfer upside down own your hand and carefully peel it off. This is when I lost part of my foot and it broke under the chin because it was not thick enough. Quickly position it on your cake. This all needs to be done quickly before the buttercream starts melting. 

Add a fun border like the e-border I learned from the video. I used a 1/4 sheet pan and did not have the room to add the extra fun stuff to my borders that Sharon teaches. I can't wait to make some more cakes using the techniques I learned. This mini-tut does not include all the stuff and expert tips that Sharon teaches so be sure to watch the video and visit her blog here: http://sugaredblog.blogspot.com/2010/11/tulip-time.html
Happy baking!
Missy
I love to hear your comments, so if you have any hints or tips be sure to share, and if you want my reply, leave you email add.!
Friday, March 18, 2011
Apron Swap Partner


I still haven't made me one! I'll show you the apron she sends me when I get it, she lives in Canada, so it will be a couple of weeks probably.
Check out Penny's blog here, she's a great seamstress: http://handssewfull.blogspot.com/
What have you sewn lately?
Thursday, March 17, 2011
His Eye is on the Sparrow Cake

I used the recipe for my lemon meringue cupcakes from here: http://missyscakesandaprons.blogspot.com/ to make the "center piece" cake of the cupcakes. Please excuse the quality of some of the pictures, thay are kind of fuzzy. I started by making the nest first. I added some gumpaste mix to my fondant and formed a "nest" shape over a bowl. Next time I will put crumpled aluminum foil over the bowl first to give texture to the inside of the nest.


Then I used crumpled aluminum foil to add texture to the nest by pressing it on top of the nest. Then I rolled several "snakes" in varying lengths to put around the nest for a "twiggy" look. I used lemon extract to stick on the twigs. I used the aluminum foil to press the twigs on with to add more texture. I've never seen a smooth nest before so I tried to give it as much texture as possible. I let it dry overnight, I really should have made it a couple of days before, but I forgot.


I found several pictures online of birds made from fondant that I liked. I started with the body and "pulled" the tail out from the back. I used the back of my palette knife to mark lines in the tail to look like feathers. I had the birds' tails resting on the edge of my tray to dry so they wouldn't droop.
I then broke a toothpick in half (some people would suggest using a piece of spaghetti) and stuck it in the body where I wanted the head to go. When I made the head, I made a ball then elongated it just a tad bit. I used the extract on the head where I wanted it to stick to the body. When I made the beak I rolled a cone, then stuck my knife in the middle to open it a little. and attached it and two little black dots (eyes) to the head . For the wings, I rolled a tear drop shape and then rolled it smooth with a roller. Then I used the back of my palette knife again to make feathers. I pulled some of the wings out to give it a more realistic look.


I got the cutest baby mold here: http://www.decoratethecake.com/store/WsDefault.asp?One=109 from Decorate the Cake. I had been wanting to use this mold for the longest time! I used copper color to make flesh coloring for the babies. I made two babies for the nest since it was a double shower for two ladies. Roll a sausage shape of the flesh colored fondant and press into the mold. Here is a picture of the mold from Decorate the Cake's website.

I read a great tip from Cake Central, after you put the fondant in the mold, put it in the freezer for ten minutes to harden, then it pops right out with no problems. Let it dry before touching it to avoid fingerprints. Use your palette knife to trim any excess fondant and any other areas that might need it. Make sure you do not have any creases in the fondant, or it will show up on your baby. That is why one of the babies have a hat. I used carob powder to make the hair and added a touch of dusting powder to the cheeks. Aren't they adorable?


I used cutters to make the flowers and leaves. When I noticed how terrible the inside of the nest looked, I added some toasted coconut. I think it actually looked better with the coconut. I waited until I got the shower and put a grapevine wreath on the green cake plate I picked up on clearance at Hobby Lobby for $7. (Oh, I put the 6 in cake on a 7 in plastic cake plate.) I iced the cake with IMBC, but the humidity made the icing "wet" and it would not smooth on, so I grabbed my airbrush gun and made the cake look like a tree top instead. :) Sometimes mistakes turn out better then your original thought! I really enjoyed making this cake! For more about the shower go here: http://missyscakesandaprons.blogspot.com/2011/03/his-eye-is-on-sparrow-baby-shower.html
I hope this tutrial will you help you with your next cake! Any questions, feel free to ask, but you will have to leave me your email add. if you want a reply!
Happy baking!
Missy

Friday, March 11, 2011
Lemon Meringue Cupcakes

Mine don't look that pretty, I was going for more of a nest look. The only thing is, my husband kept catching the cupcake wrappers on fire! :) If it had been me, I would have probably dropped the "on fire" cupcake and caught my kitchen table on fire. I think this is why my husband offered to torch them for me! This is the blow torch my husband bought me. We used a $5 off coupon at Bed Bath and Beyond, so it was only $15. http://www.bedbathandbeyond.com/search/search.aspx/blow-torch/?sstr=blow+torch&grid=20&dim=1&nty=1&
Ingredients
Makes 24 cupcakes
Lemon Chiffon Cupcakes
3 cups cake flour (I used half organic, unbleached all purpose flour)
2 teaspoons baking powder (I used aluminum -free)
1 cup sugar, divided (I used used thot not sugar)
4 large egg yolks
1 cup vegetable oil (I used grapeseed oil)
1 cup water
1/2 teaspoon vanilla extract
Zest of 1 lemon
4 large egg whites
Lemon Curd ( I doubled the cupcake recipe, but not the curd and I had some leftover)
1 cup butter, cubed
1 cup sugar (I used palm sugar)
1 cup lemon juice
Zest of 3 lemons
10 large egg yolks
Swiss Meringue Buttercream
4 large egg whites
1 cup sugar (I used palm sugar)
Directions
Prepare the Lemon Chiffon Cupcakes.
Preheat the oven to 375°F. Prepare pans with cupcake liners. Sift the flour, baking powder, and half the sugar together into a large mixing bowl or stand mixer and reserve. In another large mixing bowl or stand mixer bowl, combine the egg yolks, oil, water, vanilla, and zest. Mix with a handheld mixer or whip attachment until thoroughly combined, about 1 minute. Add the egg yolk mixture gradually to the dry ingredients, mixing with a handheld mixer or whip attachment on medium speed until a paste forms. (I accidentally did this backwards, and I believe it made the cupcakes dry)When a paste has formed, scrape down the sides of the bowl, and continue adding the remainder of the yolk mixture until it is all incorporated. Beat for an additional 2 minutes on medium speed. In a separate mixing bowl or stand mixer bowl, whip the egg whites with a clean whip attachment on medium speed until soft peaks form. Gradually add the remaining sugar while beating the egg whites and continue to beat until medium peaks form. Gently blend one-third of the beaten egg whites into the egg yolk mixture to lighten it. Gently fold in the remaining egg whites. Divide the batter evenly among the prepared pans. Bake at 375°F until the top of the cupcakes spring back to the touch, about 20 minutes. Let the cupcakes cool in the pans for a few minutes before turning out onto a wire rack to finish cooling before decorating.
Prepare Lemon Curd. (I would suggest making this the night before, and I did not cook it long enough so it was not as thick as it should have been, and make to strain it, I didn't it and it caused all kinds of problems when I was piping it into the cupcakes)
Combine half of the butter, half of the sugar, the lemon juice, and zest and bring to a boil over medium heat, stirring gently to dissolve the sugar. Meanwhile, blend the egg yolks with the remaining sugar. Temper the mixture by gradually adding about one-third of the lemon juice mixture, stirring constantly with a whip. Return the tempered egg mixture to the saucepan. Continue cooking, stirring constantly, until the whisk leaves a trail in the curd. Remove from the heat. Stir in the remaining butter. Strain the curd into a shallow container or bowl. Cover with plastic wrap placed directly on the surface of the curd. Cool over an ice bath. Store the curd, covered, in the refrigerator for up to 3 days.
Prepare Swiss Meringue Buttercream.
Put the egg whites and sugar in the clean, grease-free bowl of a stand mixer fitted with the whisk attachment and stir together until the sugar is blended into the egg whites. Place the bowl over a saucepan of simmering water and stir frequently until the sugar dissolves and the mixture reaches 140°F. Transfer the bowl to the mixer and beat on high speed until the meringue is thick and glossy and has a stiff peak. (I was lazy and did not do this, wish I had, instead I melted the sugar with some water like I do with my IMBC)
Finish the cupcakes.
Fill a piping bag fitted with a large plain tip two-thirds full with lemon curd. Insert the tip as far as it will go inside the center of the cupcake and apply gentle pressure. Try not to squeeze too hard or lemon curd will squirt out the top of the cupcake. Stop filling once you see any lemon curd around the base of the tip. Repeat with the remaining cupcakes. Clean the piping bag and tip and fill it two-thirds full with Swiss meringue. Pipe a large pearl of meringue on top of each cupcake. Use the back of a spoon to lift up areas of the meringue, creating spikes. Lightly toast the meringue with a kitchen torch or under the broiler until the tips of the meringue are golden brown.

I tried the piping bag method, but my tip would not fit on a coupler and kept poking back up into the the bag. I had lemon curd all over my hands. Then I had lemon seeds that I missed because I did not strain the curd, clog up the tip constantly. So finally, I took a big tip and cut holes in the top of the cupcakes, and put a bigger tip on my bag to pipe out the lemon curd. You can see the holes I made in the above picture.
It was worth the time and mess, they were delicious. I've been putting the leftover lemon curd in my yogurt, it's delicious!

Wednesday, March 9, 2011
His Eye is on the Sparrow Baby Shower

To find out how to make the cake, go here: http://missyscakesandaprons.blogspot.com/2011/03/his-eye-is-on-sparrow-cake.html
For the recipe on the lemon merigue cupcakes, go here: http://missyscakesandaprons.blogspot.com/2011/03/lemon-meringue-cupcakes.html

When I started thinking up themes for this shower I thought of the song "His Eye is on the Sparrow" and I thought about how God takes care of us and our children. I used the verses Psalm 84:3 "Yea, the sparrow hath found an house, and the swallow a nest for herself, where she may lay her young." and Matt. 10:29-31 ".....Fear ye not therefore, ye are of more value than many sparrows."


My friend Julia painted the posters for me. Didn't she do a great job?
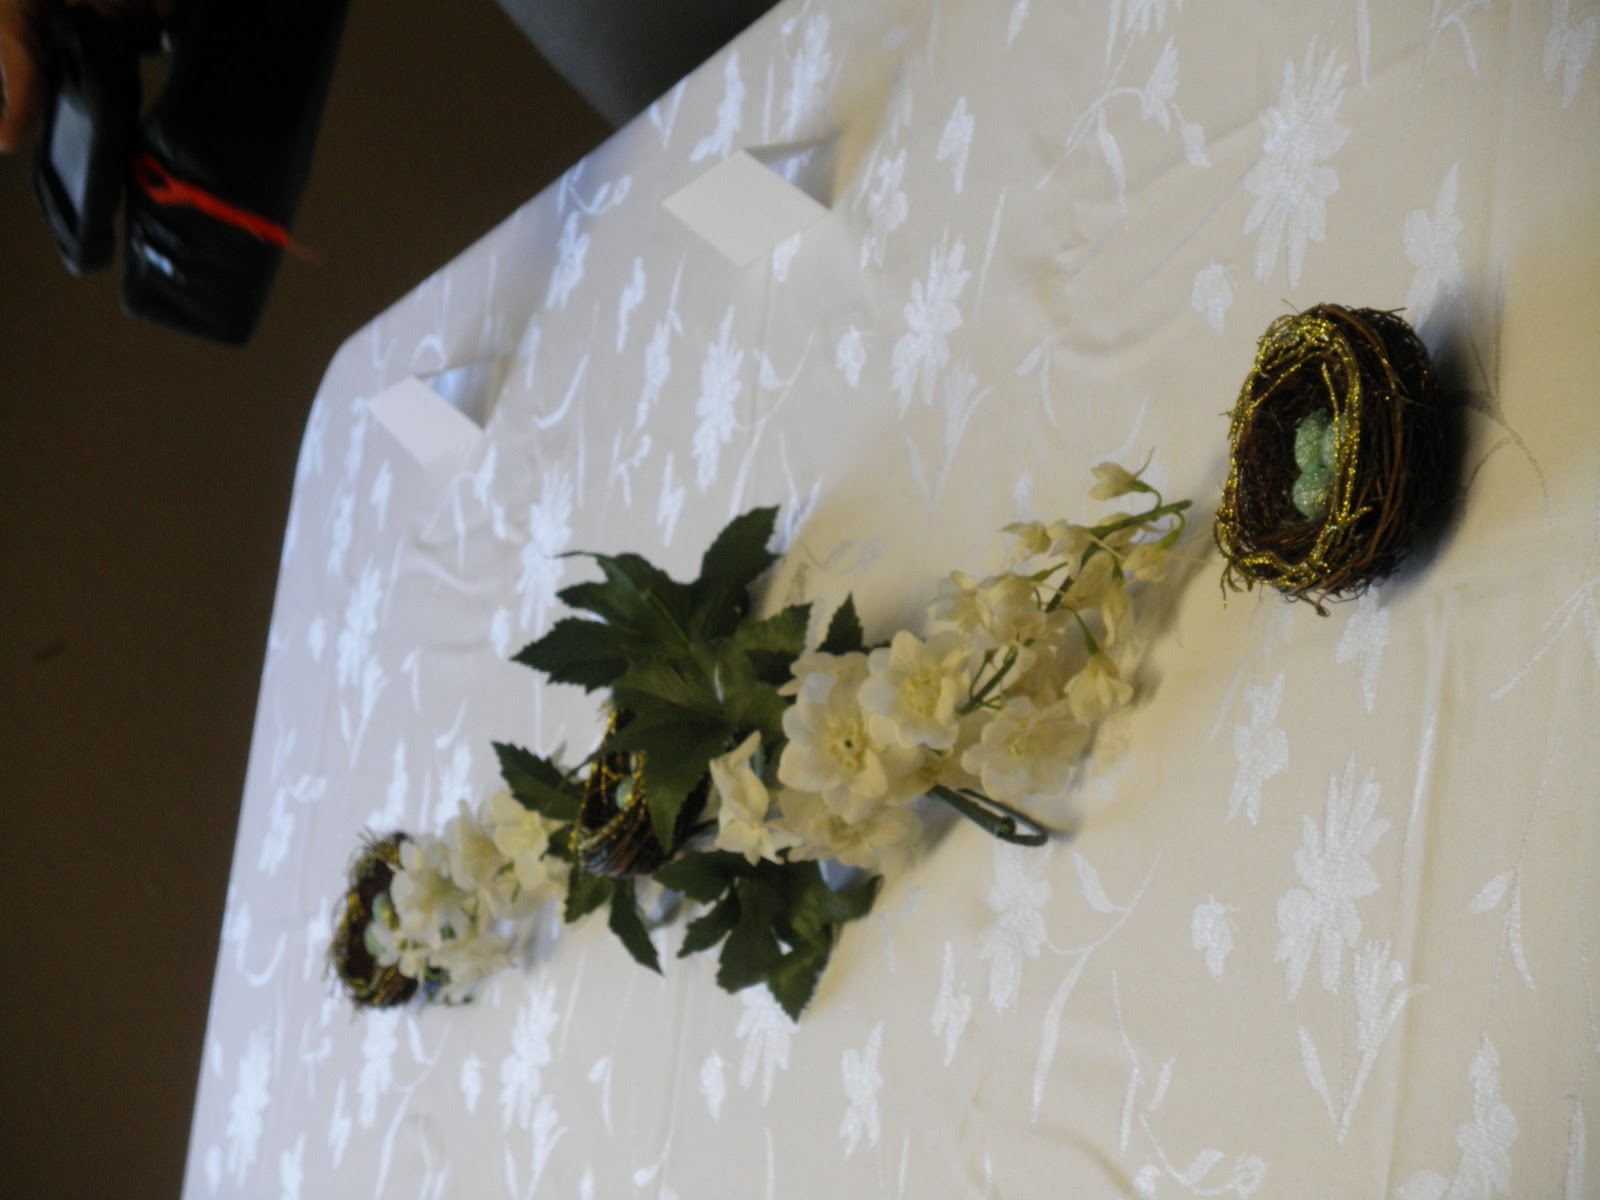


I found these Christmas ornaments on clearance for 75% off after Christmas for like 75¢ each. I painted glue over the eggs and sprinkled blue glitter over them, borrowed greenery from my friend Marie who was helping with the shower, found the white flowers very cheap at a thrift store, and there was my table decorations! They match the plates and napkins which I forgot to take a picture of.
I did this shower a little differently, we only had one game. I took memory verses, cut them in half and they had to match up the verses. Renee helped me with the game and gave the winner a bird feeder and bird seeder. Katherine was pretty excited about her win!
Katherine (on the left) gave the devotion and Miss Debra (on the right) sang "His Eye is on the Sparrow"


Joeann (Miss Debra's daughter, on the left) sang "Under His Wings" and Miracle (Skye's daughter on the right) sang "The Great Speckled Bird" Miracle also made matching bird necklaces and earrings for the mothers and their mothers. She also made nest pins for the favors.


When I host a baby shower, I believe it should be about the mother to be and a blessing to her. We started the shower off with a prayer and blessing for the babies to come. This post is already too long, so I'll put up some more pictures and then talk about the food and the cake tomorrow. I have a great new recipe to share! I hope you enjoyed!

For more information on the food go here: http://missyscakesandaprons.blogspot.com/2011/04/his-eye-is-on-sparrow-food.html


Subscribe to:
Posts (Atom)