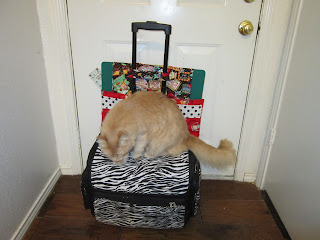
 I made this bag the night before my TOGA(Treadle and handcranks, quilting retreat) I stayed up until midnight finishing it and forgot to take pictures, but that's okay because I needed to add a top to keep it from gaping open.
I finished it today (I'm supposed to be cleaning the house, but as I was cleaning off the table, there it was, and I didn't want to just move it to another room and forget about it)
The first step is to measure your mat, to decide how big you want your bag. I added an extra inch. It looked like a pillowcase!

I sewed two pieces of material right sides together. I did this for the top piece and bottom piece. Then turn right side out and sew the top. On the bottom piece, make sure you sew the straps on BEFORE sewing it up into the bag, I forgot and what a pain that was! Fold your bottom piece and hold it up to the sewing machine case to decide where to sew the bottom strap. It will be resting on top of the case to keep it up off the ground. You don't want it dragging. Sew the second strap. Make sure you measure the top of the handle, I measured the bottom, then could not get the strap over the handle.
Since the top was gaping open, I decided to sew a top onto it. I'm glad I made it in two pieces, this way I can have rulers sticking out the sides, even when the bag is closed.
I did not use interfacing, but wish I had. It would provide more stability and make it last longer. I took my top flapand put the mat and rulers in the bag to decide how tall to make it. Give a couple of extra inches, just in case.
I sewed the flap to the back, gave myself an inch of the bottom hanging inside the bag, hoping this will give it a little more strength. I used my ruler to decide where to put my magnetic snaps. I was going to use velcro, but then remembered I had these snaps.
I made sure both snaps lined up, using two rulers helps a lot!
Let's back up a moment though. Sew your snaps onto the flap, BEFORE sewing the two pieces together, another "oops" moment. I had to cut a slit in the material to put the backing in, otherwise you would have been able to see it in the front. Maybe I should have gone ahead and done that, it would have been more stable. Another reason for interfacing!
I then put another strap on the back of the flap. I put this one an inch down from the top. Otherwise the weight of the mat brings the bag forward.
Here, Boots is showing you the front of the bag. He's my old boy, 16 years old.
The baby, Pippi, is showing you the inside with the flap up. Today is her birthday! She is one (we think, she was a feral kitten and we guessed her to be about four weeks old).
I turned it around to show you that side and Tiger, my big boy, wanted to get in the picture! He'll be two in September.
See the three straps? I definitely recommend all three straps, for stability.
Squeeky, my pretty girl had to investigate also. She squeeks when you pick her up. She is about ten years old.
I hope this tutorial helps! I'm pretty excited about it. This was actually an original idea to me idea! I've not seen one before! I'm sure someone else has come up with the idea though!
Let me know if you have any questions!
Missy
I love this material! I have used it to make a laptop bag here: http://missyscakesandaprons.blogspot.com/2011/04/lap-top-bag.html
and an essential oil carrier here:
http://missyscakesandaprons.blogspot.com/2012/01/essential-oil-bag-tutorial.html


11 comments:
this is a terrific idea! Hugs and thank you for joining in the hop fun xo
Very clever, Missy! You need a pin button for Pinterest so that I can pin this for you!
~Cindy
What a great idea Missy! Perfect for carrying your mat! Thanks for sharing!
Quilting at the River Linky Party Tuesday
This is a very creative idea! I think I might just need to make me one! Thank you!
Super idea. You explain things very well - so clear. Thank you. We all can use one of these!
[i'm visiting from Connie's Tues LinkyParty]
What a wonderful idea! Genius! I love that you saw a problem and created such a great solution! You have been featured on Fabulous Fridays! Thanks for linking up! http://www.artistic31mama.com/2012/05/fabulous-fridays-linky-party-10.html
Another clever idea!
Great project! LOVE your sweet cats!
Thanks so much for sharing tutorial! Would love to have you visit me sometime.
Have a fabulous day!
Hugs from Portugal,
Ana Love Craft
www.lovecraft2012.blogspot.com
visiting from sew darn crafty. fabulous idea. It works so well
A very clever idea!!!
What a great idea! Anyone going to a retreat or any type of sewing day NEEDS one! I have the same fabric- SO cute!
Post a Comment